
HIPAA-Compliant Zoom Meetings
For clinical work, you must use a special version of Zoom that is HIPAA compliant. You can schedule and host HIPAA-compliant Zoom meetings from the Zoom website (zoom.temple.edu) or via the Zoom desktop client. Instructions for scheduling and starting HIPAA-compliant Zoom meetings are below.
Scheduling
There are two ways to schedule a Zoom meeting. You can either use the Temple-branded Zoom website (located here: https://zoom.temple.edu) or the Zoom desktop application.
From Zoom Website
|
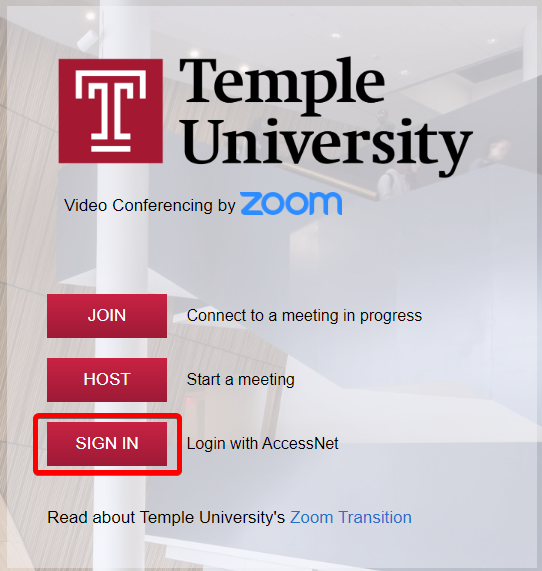
1. Go to the Temple-branded Zoom website and click Sign In:
If you are prompted for your Temple credentials, please enter them as you usually would.
|
 |
|
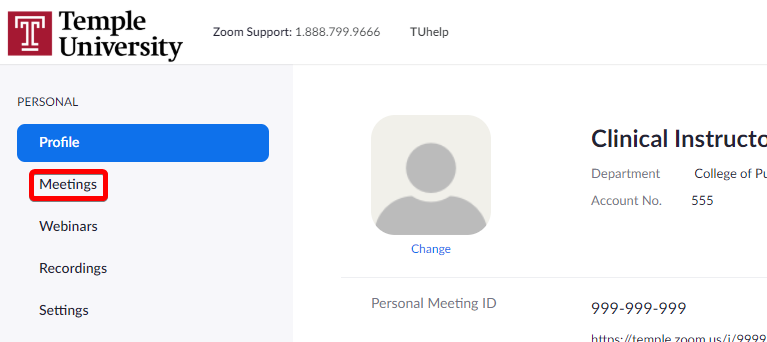
2. Click Meetings on the sidebar.
|
 |
|
3. Click Schedule a New Meeting.
|
 |
|
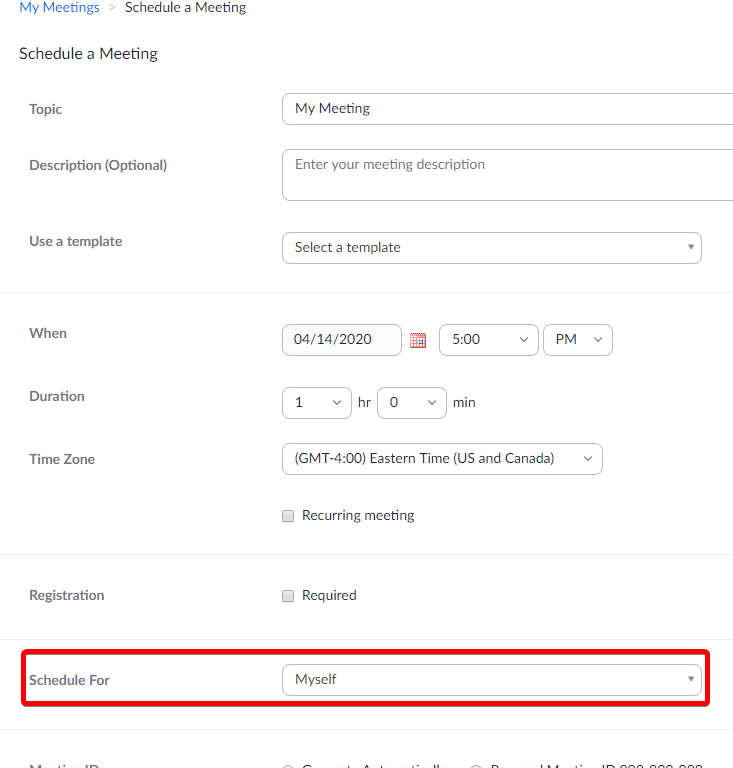
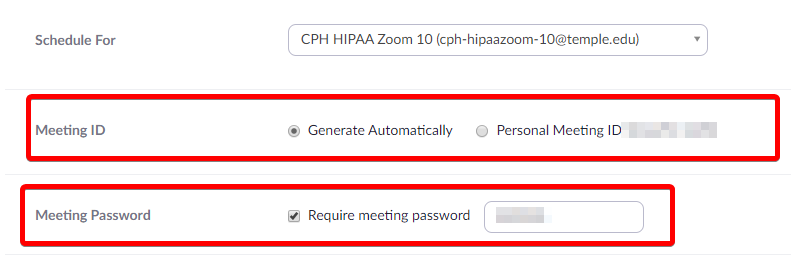
4. Before you fill out any information, find the Schedule For option towards the bottom of the current screen.
|
 |
|
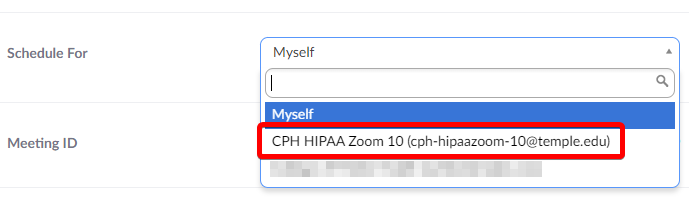
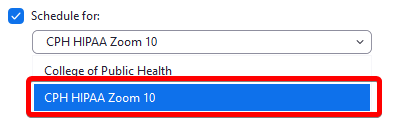
5. Click into the Myself dropdown and select the account you would like to schedule the meeting under. In this case, select the account listed as CPH HIPAA Zoom.
|
 |
|
6. Fill in the rest of information as needed for the meeting, we recommend using Generate Automatically (if the option is given) and Require Password for extra security.
|
 |
|
7. If someone besides you will be hosting the meeting, please add them as an Alternate Host. You will need to enter their email in the form of accessnet@temple.edu. The alternate host will recieve a copy of the meeting invitation with a Start link. You may also add yourself as an Alternate Host if you would like to receive an email invitation.
|
 |
|
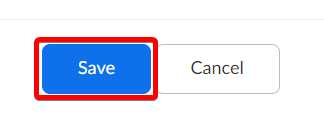
8. Click Save to schedule the meeting.
|
 |
From Zoom Desktop Application
|
1. Open the Zoom desktop application using any of the Zoom shortcuts available on your computer.
If you do not have the Zoom client installed, you can follow the "From Zoom Website" instructions.
|
 |
|
2. Click Schedule.
|
 |
|
3. Fill in information as needed for the meeting, we recommend using Generate Automatically and Require Password for extra security.
|
 |
|
4. Click Advanced Options.
|
 |
|
5. Check the Schedule for box.
|
 |
|
6. If you can schedule for multiple users, you will need to select the one labeled "CPH HIPAA Zoom".
|
 |
|
7. If someone besides you will be hosting the meeting, please add them as an Alternate Host. You will need to enter their email in the form of accessnet@temple.edu. The alternate host will recieve a copy of the meeting invitation with a Start link. You may also add yourself as an Alternate Host if you would like to receive an email invitation.
|
 |
| 8. Finish scheduling by clicking Submit. | 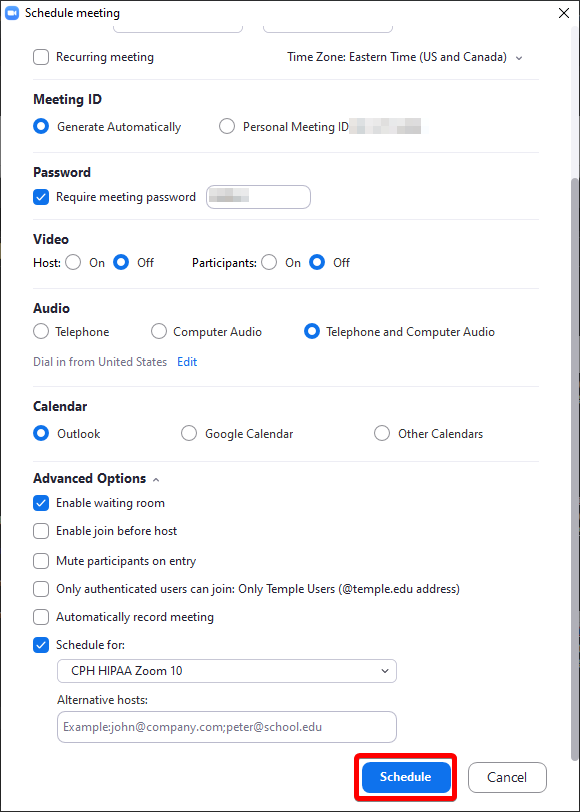 |
Starting a Meeting
There are a few ways to start scheduled Zoom meetings.
From Zoom Website
|
1. Go to the Temple-branded Zoom website and click Sign In:
If you are prompted for your Temple credentials, please enter them as you usually would.
|
|
|
2. Click Meetings on the sidebar.
|
|
|
3. If you have meetings that are scheduled either by you, or in any account you have access to, they will all be listed. Alternate hosts will NOT see the meetings listed here. Alternate hosts must follow the instructions listed in the Starting a Meeting -> From Zoom Invitation Email section.
|
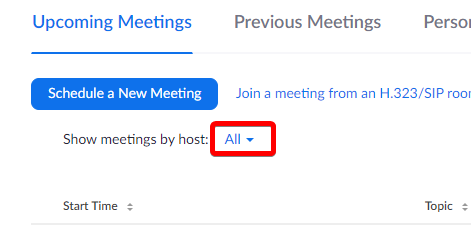 |
| 4. You can filter which accounts you are seeing scheduled meetings for by using the Show meetings by Host menu. | 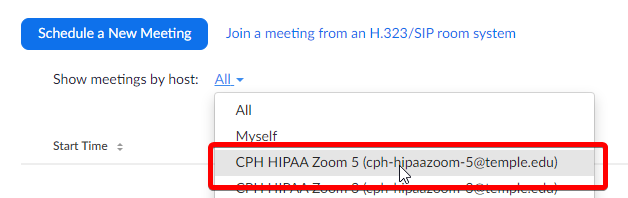 |
|
5. To start a meeting, click the Start button on the right-side of the page for the specified meeting.
|
 |
|
6. You can also edit the meeting by clicking on the meeting's topic link.
|
 |
From Zoom Desktop Application
|
1. Open the Zoom desktop application using any of the Zoom shortcuts available on your computer.
If you do not have the Zoom client installed, you can follow the "From Zoom Website" instructions.
|
|
|
2. If you see a banner at the top of the Zoom client, you may start your meeting by clicking the Start button there.
|
 |
|
3. Otherwise, click Meetings button at the bottom of the Zoom client.
|
 |
|
4. You will see all of the currently scheduled meetings for yourself and this account. Alternate hosts will NOT see the meetings listed here. Alternate hosts must follow the instructions listed in the Starting a Meeting -> From Zoom Invitation Email section.
|
 |
|
5. If you mouse over a meeting, you will see options to "Start" and " … " (three dots). The three dots menu gives you the option to Copy Invitation, Edit or Delete. |
 |
|
6. Click Start to start your meeting.
|
 |
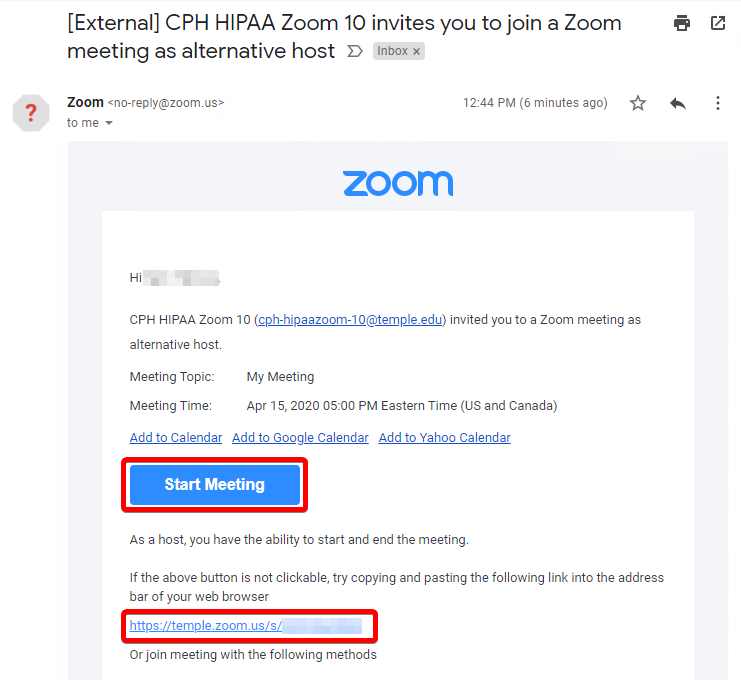
From Zoom Invitation Email
|
1. Open the email invitation you received either from Zoom or directly from the scheduler.
|
|
|
2. Click the link provided to launch the meeting.
|
 |
|
3. If you are prompted with: "If you are the meeting host, sign in to start the meeting", please find the "Sign in to Start" button.
|
 |